Sunday, December 18, 2011

Smoked Pork Chops


In every man's life there comes a time to make a choice. A choice to be great or to blend in with the din. Today, I was presented with just such a moment.

A few days ago I was at Wagner's Orchards to pick up a pastured beef rib roast for Christmas Dinner, while I was there, Harold, being the consummate sales man, talked me into a couple berkshire pork chops - he didn't so much talk as lay a dozen out on the counter for me to look at; that's a salesman!

Here it is Sunday morning and I'm informed that my Mother-in-law will be joining us for dinner, and it so happens that these lovely chops have been beckoning. Now, it's decision time. How do I cook them? They weren't cheap and I want to taste the "berkshire-ness" that they're famous for. I decide, I must smoke them. Pork loves smoke. Plus it gives me a reason to fire up the Big Green Egg.

Here we go...


Look at those bad boys, begging for some salt and a delicate apple wood kiss.

Onto the small Big Green Egg for a quick sear.


Smoking away on the small. Tastiness imminent.

250° dome temp, about 40 minutes, pulled with internal temp of 145° and allowed to rest about 5-10 minutes while I finished running the potatoes through the food mill (that makes good "mashed" potatoes) and getting the roasted carrots on the table.


There they are all finished. Now, I think I've committed a cardinal sin of "food blogging," I didn't take a photo of the plate. Well, I was hungry, had two hungry kids, a hungry wife and a hungry Mother-in-law. Ahwell.

The chops were fantastic, though. They did not blend in with the din.

Wednesday, December 14, 2011

Milk Kefir Uses

So I was getting a bit bored with just drinking the plain milk kefir with some vanilla in it.  Aaron and I had went out form the WECSA dinner and they had a kefir dip which was a ranch style dip made with milk kefir using cream instead of a lower fat milk.  We got to thinking about other ways to make and eat the milk kefir.  I purchased a yogurt cheese maker for Aaron for Christmas and decided to give it to him early.

    
We used it to make kefir cheese!  It is smooth and delicious!  I add a bit of flavouring such as  extract, fruit and/or sugar/honey and the kids even like it.  I have not experimented with different recipes much yet but plan on getting creative.


I zipped up approximately 1/4c. frozen raspberries and 1/4c. of frozen strawberries with 1c. kefir milk and 1c. kefir yogurt and a tablespoon or 2 of honey (depending on your sweet preference).   It was fantastic.  We have some frozen blueberries that we had picked fresh this summer that I will whip up in a day or two.

I think if I had made it will 2cups of the yogurt kefir instead of half milk and half yogurt it would have been thicker and smoother.  It was good just the way I made it as well but I will experiment and change it up regularly.     


Then with the left over whey from the yogurt... I bring it to a boil and it separates and once I strain it I have a kefir cheese for on top of salads or in pasta dishes!  I have been using it as a replacement for feta on my greek salads.  The kefir cheese is more crumbly... a texture and taste  is somewhere between feta and ricotta.  The taste is bland until you add a pinch of salt which makes it is quite good.  We are going to try to get enough kefir cheese to make a lasagna with... I think it will be fantastic!

Tuesday, December 13, 2011

Pay It Forward 2011

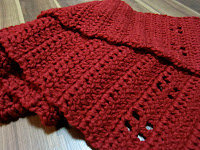
Earlier this year in January my cousin had posted a pay it forward post stating that I would make the first 5 people who comment on my post something homemade sometime in  2011.  Of course I procrastinated until the very last moment.  I now am scrambling to make something for the 5 people on my list.  I have my cousin, one of my bff's, my Dad's fiance, Aaron's friend (and mine) from work and an old friend on the list.  So far I made a scarf for Aaron's friend Mike... since he lives about an hour away and Aaron will see him Friday, I completed his first (even though we saw him last weekend... I hadn't even started yet!).  I call it the Sanderson Scarf!  :)


 Using a 9mm hook, I used a simple double crochet pattern.  I stitched 20 across and keep track of the rows, but I went until it hung across Aaron's neck and the ends were past his bellybutton.  I added some detail by skipping some stitches.


I have a few ideas for the others on the list; they are all women so they tend to be a bit easier to make for.  I may do a few different things and make some baskets but I have not decided yet.  I wish I had started earlier so I didn't have to rush so much, but it wouldn't be Christmas without a mad dash to get... in this case MAKE... last minute gifts!

Tuesday, December 6, 2011

Busy Busy!

Holidays are in full swing with lots going on.  We have had 2 Christmas parties already and even cut down our tree last friday!  Due to the hustle and bustle of the season I have gotten a bit off track with blogging.  I have a bit of things to catch up on.

I finally cooked up our teeny tiny egg!  The size of the yolk clearly effects the size of the egg; there was plenty white but the yolk was super tiny and misshapen.   I simply fried it up and could not believe the taste of this little egg!  It was like the flavour of a large egg was packed into this little bundle of deliciousness.  The texture of the egg was a bit different but in a good way.  It was more dense than a regular size egg... it was really quite fantastic!


... and so I enjoyed my little bundle of goodness!
For a family Christmas party we decided to make some salted caramels!   We adapted the recipe from makinglifedelicious.com.  The recipe we used is:

  • 1 cup heavy cream
  • 5 tablespoons unsalted butter plus more for greasing
  • 1 heaping teaspoon sea salt
  • 1 teaspoon vanilla extract
  • 1 1/2 cups sugar
  • 1/4 cup light corn syrup
  • 1/4 cup water

1.  Line bottom and sides of an 8-inch square baking pan with parchment paper, then lightly butter the parchment.

2.  Bring cream, butter, sea salt and vanilla to a boil in a small saucepan, then remove from heat and set aside.  
3.  Boil sugar, corn syrup, and water in a 3- to 4-quart heavy saucepan, stirring just until sugar is dissolved. 
4.  Then boil, without stirring, until mixture just starts to turn color.  Lightly swirl the pan to even out the color as it darkens.  (We allowed ours to boil a bit to fast and the sugar mixture just slightly overcooked.)


5.  When the color is a shade darker than what you want for your caramel you add the cream and butter mixture... be careful as it will bubble up.  


6.  Continue to simmer, stirring often and keep your candy thermometer submerged.  Once you reach your ideal temperature, somewhere between firm and hard ball, (we did 255 degrees) you immediately remove the pot from the heat and pour it into the lined baking pan.


7.  Allow to cool for a few hours until the caramels have set.  Cut into desired size and wrap them in waxed paper with twisted edges.


The caramels turned out great.  The sugar was slightly overcooked but definitely not enough to ruin the caramels.   The colour was nice, it was just reached a bit too fast; you want the sugar mixture to boil but not on high.